
React Native Push Provisioning
This page covers everything you need to add the Add to Wallet button to a React Native app: Apple Wallet on iOS and Google Wallet on Android. By the end, end customers can add their card to either wallet from your app, and your app is ready for release on both platforms. Before you start, make sure tokenization is live on your Bank Identification Number (BIN) and you've confirmed a build path with your Customer Success Manager.
Part 1: Requirements
Complete the requirements for each wallet you support.
Apple Wallet (iOS)
Apple Wallet push provisioning requires an entitlement, a permission Apple grants your app to add cards to Apple Wallet. This is separate from Apple's Program Review, the one-time review that enables manual provisioning.
Step 1: Request the Apple Pay In-App Provisioning Entitlement
- Request Apple Pay In-App Provisioning for your app through Apple's In-App Provisioning Submission Form.
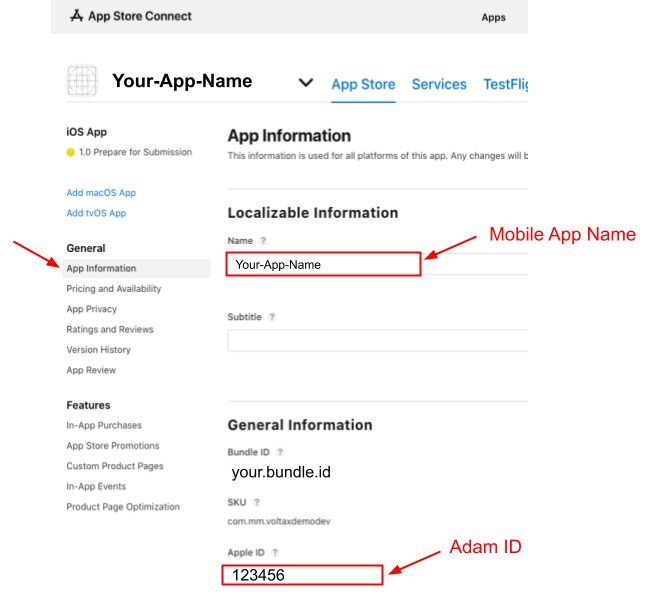
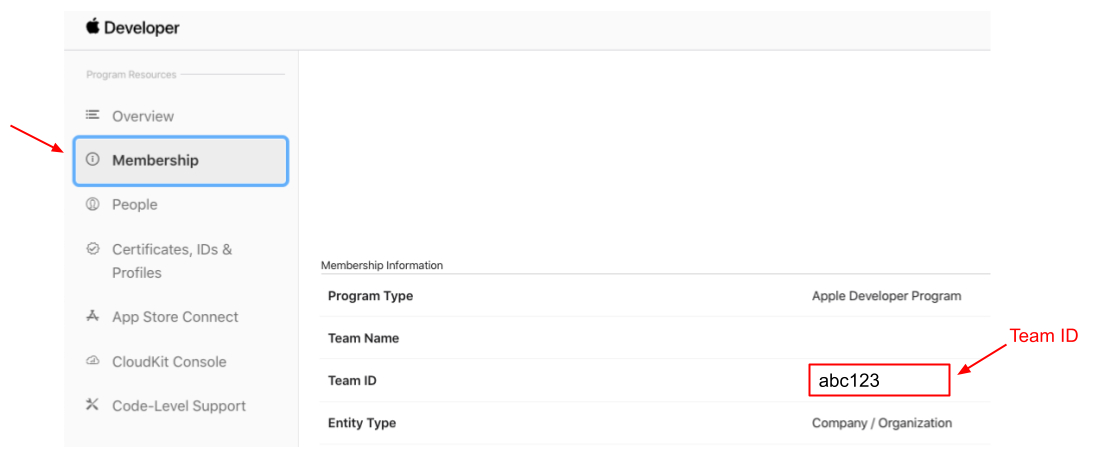
- Send your Customer Success Manager the Mobile App Name, Team ID, and Adam ID (the App Store's numeric ID for your app) for each production instance of your app. Unit shares them with Visa so Visa can link your app to your card program.
- The Mobile App Name and the Adam ID can be found in App Store Connect after selecting one of your apps:
- The Team ID can be found in your Apple developer account under the "Membership" section:
- The Mobile App Name and the Adam ID can be found in App Store Connect after selecting one of your apps:
Step 2: Set Up Your App Once Apple Grants the Entitlement
Once Apple grants the entitlement, add it to your distribution provisioning profile and turn on the Wallet capability for your app in your Apple developer account.
Add the In-App Provisioning Entitlement
- Sign in to your Apple developer account.
- Navigate to "Certificates, Identifiers & Profiles".
- Select "Distribution" underneath the "Profiles" heading on the sidebar.
- Select the distribution iOS provisioning profile that will be used to deploy the app to the App Store.
- Select the "Apple Pay In-App Provisioning Distribution" entitlement from the drop-down to add the entitlement to the profile.
Add the Wallet Capability
- Sign in to your Apple developer account.
- Navigate to "Certificates, Identifiers & Profiles".
- Select "App IDs" underneath the "Identifiers" heading on the sidebar.
- Select the app identifier that will be used to deploy the app to the App Store.
- Under the "Capabilities" tab, select the "Wallet" capability:

Google Wallet (Android)
To add cards to Google Wallet from your app, your program needs its own profile in the Google Issuer Console, Google's portal for card issuers. Visa connects your program to Google on your behalf, so you complete Google's onboarding up to the key exchange, submit one intake request, and send Unit your app details. Unit handles the remaining steps.
Step 1: Create a Google Issuer Console Profile
Create your own Google Issuer Console profile by following the steps outlined in Google's Get Started page.
When the profile setup asks for your Visa BID (Business ID, Visa's identifier for the bank that issues your cards), enter the BID for your bank partner:
| Bank partner | Visa BID |
|---|---|
| Thread Bank | 10034854 |
| i3 Bank | 10006981 |
If you're not sure which bank partner issues your cards, ask your Customer Success Manager.
Step 2: Add Unit as a Technical Contact (Card Component Only)
If you're using the Card component, add cardops@unit.co as a technical contact on your profile. Google has already approved the Card component's screens, so Unit completes Google's launch process for you.
If you're building a custom integration, skip this step. Your team completes Google's launch process directly in the Issuer Console.
Step 3: Complete Onboarding Through the Key Exchange
- Navigate to the Google Issuer Console.
- Complete the first four steps of Issuer Console onboarding, including Google's Non-Disclosure Agreement (NDA) and Click to Accept (CTA) agreement.
Because Visa connects your program to Google, you don't upload keys in the Issuer Console. When Google requests a key exchange, complete the Unified Push Provisioning API Intake Request instead.
On the intake request, enter these values:
- Type of Request: Aggregator/Program Manager linking
- Network: Visa
- Aggregator Merchant ID:
BCR2DN4TXL64HAC5
Google confirms when the setup is complete.
Step 4: Send Unit Your App Details
Once Google confirms your intake request, send your Customer Success Manager:
- Merchant ID: Your Merchant ID from the Issuer Console.
- App package: Your Android app's package name.
- Provisioning model: By default, Google Wallet stores both a device token, which stands in for the card during payments, and the underlying card number, which lets end customers spend online and on devices that can't create a device token. You can keep both, or choose the device token only.
Unit shares these with Visa so Visa can link your app to your card program.
Requirements Complete
Once you've sent Unit your app details for each wallet, Unit sets up push provisioning with Visa, which typically takes 10–20 business days. Your Customer Success Manager will let you know when setup is complete and your developers can start the integration.
Part 2: Integration
Start once Unit confirms that setup with Visa is complete. A React Native app integrates Visa's Digital Enablement (VDE) SDK through native modules on each platform. Unit provides Visa's SDK for both Apple Wallet and Google Wallet.
Choose your build path:
- Card component: Complete Add the Visa SDK, the Visa SDK Configuration Module, and the Visa SDK Push Provisioning Module in the Visa SDK section below, then follow Add Card to Wallet in the Card component guide. Then continue to Part 3: Test and Launch.
- Custom integration: You build your own card screen and Add to Wallet button, and your app runs the Add to Wallet flow through the Visa SDK native modules. Follow every step in Visa SDK Integration below, then return to Part 3: Test and Launch.
Part 3: Test and Launch
Apple Wallet (iOS)
- Environment: Test in production, as Visa requires, on a physical iPhone. The Simulator isn't supported.
- Attempt limit: Visa's SDK allows up to 7 provisioning attempts per device per 24-hour period. If you hit the limit, contact your Customer Success Manager.
- Test builds: Distribute test builds through TestFlight, Apple's beta testing service.
- Release: Once testing is complete, release your app to the App Store through Apple's standard process.
Google Wallet (Android)
- Device: Test on a physical Android device with Google Wallet installed and updated to its latest version. Emulators aren't supported.
- Google's launch approval: Before Google Wallet push provisioning goes live, Google requires a user experience (UX) review, test case submission, and launch approval in the Issuer Console. Google's approval typically takes about a month.
- Card component: Unit completes this process for you, using the technical contact access you granted in Step 2.
- Custom integration: Your team completes this process in the Issuer Console.
- Release: Once your Customer Success Manager confirms that Google has approved your launch, release your app through the Google Play Store.
Visa SDK Integration
In React Native, push provisioning runs on Visa's Digital Enablement (VDE) SDK through native modules on each platform, not a Unit SDK. Unit provides Visa's SDK for both Apple Wallet and Google Wallet. Both build paths need the steps in this section.
Add the Visa SDK
iOS: In your ios project in Xcode:
- Drag and drop the following frameworks from the Visa SDK package provided by Unit (version 5.6.0) into the project, select "Copy items if needed", and set each to "Embed & Sign":
VisaPushProvisioning.xcframeworkVisaInAppModuleCore.xcframeworkVisaAnalytics.xcframeworkVisaFeatureModuleCore.xcframeworkVisaMobileFoundation.xcframeworkRLTMXProfiling.xcframeworkRLTMXProfilingConnections.xcframework
- In your target's "Signing & Capabilities" tab, verify that the Wallet capability is there.
- Open the
.entitlementsfile and add the Boolean keycom.apple.developer.payment-pass-provisioning, set to1(true).
Android:
Requirements
Your app and test devices must meet these requirements:
- Android OS: The minimum Android Operating System (OS) validated for use with the VDE SDK is 9.0 (Pie).
- Huawei Devices: Because of Google's libraries and U.S. government regulations, the Android VDE SDK cannot function on certain Huawei devices.
- Android SDK API: The minimum supported version is 28, and the target version is 32.
- Kotlin: The minimum supported version is 1.7.0.
- Java: The minimum supported version is 11.
- Device: The SDK runs only on a physical Android device. Emulators aren't supported.
- Wallets: The wallets you'll add cards to must be installed on the device and updated to their latest versions.
Add the VDE SDK to Your Project
-
Get the Visa SDK package from Unit, which includes the following dependencies:
VisaPushProvisioning-5.6.0.aarVisaInAppCore-5.6.0.aarTMXProfiling-8.0-82.aarTMXProfilingConnections-8.0-82.aarplay-services-tapandpay-18.4.3.aar
-
Add the dependencies from the previous step under the
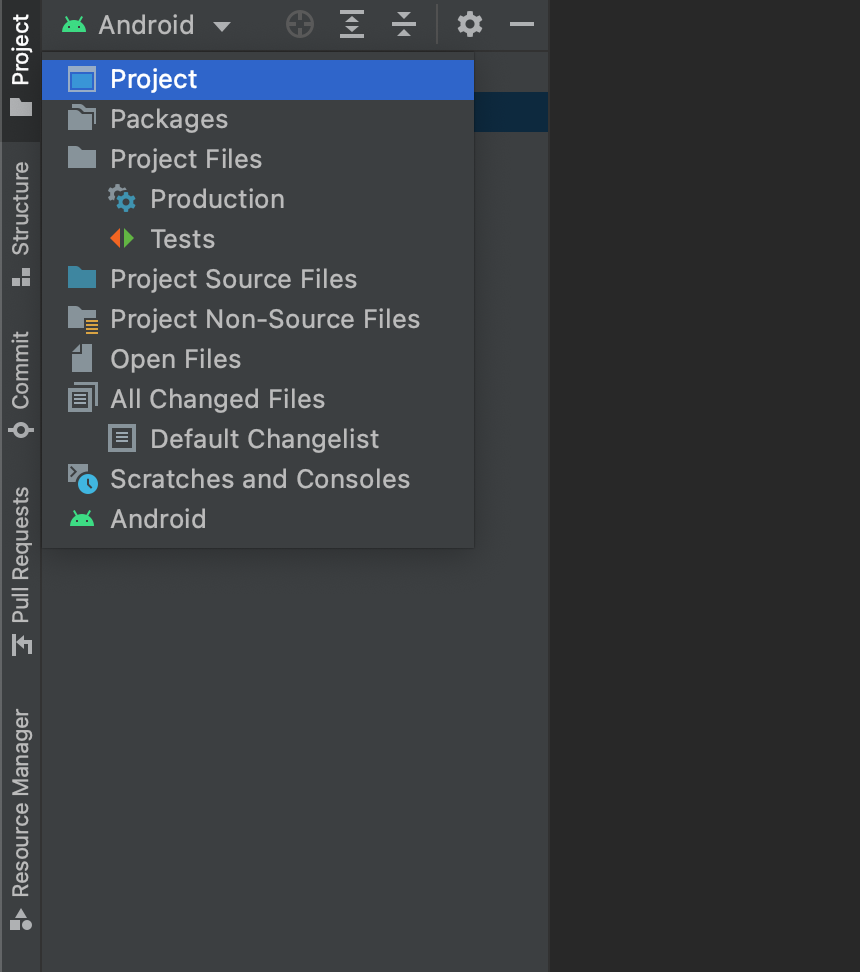
libsfolder of your project:- In Android Studio, switch your folder structure from Android to Project.
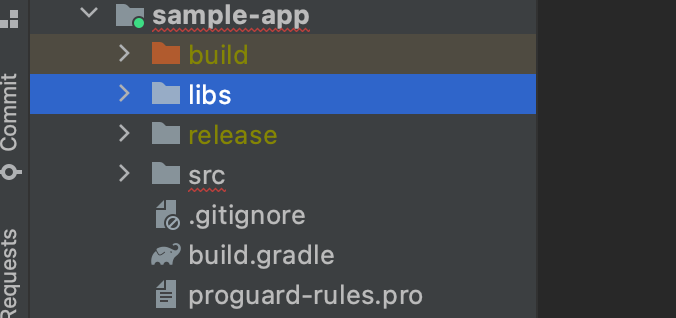
- Find the
libsfolder inside theappfolder.
- Paste the dependencies inside the
libsfolder.
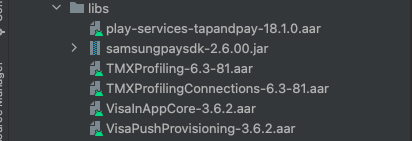
- If the
libsfolder doesn't exist, create it:- Make sure the folder structure is set to Project.
- Right-click your app name in the directory tree, go to "New" ⇒ "Directory", and name it "libs".
-
Declare the following Gradle dependencies, including the open source dependencies listed:
//Only if App is developed in kotlin and using kotlin-plugins for development then below can be
//used for kotlin coroutines dependencies as well, no need to add separate dependency.
plugins {
    id 'com.android.application'
    id 'org.jetbrains.kotlin.android'
    id 'kotlin-android-extensions'
    id 'kotlin-kapt'
}

dependencies {
    //In-App Provisioning SDK
    implementation files('libs/VisaPushProvisioning-5.6.0.aar')
    implementation files('libs/VisaInAppCore-5.6.0.aar')
    implementation files('libs/TMXProfiling-8.0-82.aar')
    implementation files('libs/TMXProfilingConnections-8.0-82.aar')
    //Google Wallet
    implementation files('libs/play-services-tapandpay-18.4.3.aar')
    implementation "com.google.guava:guava:33.2.1-android"
    implementation "com.google.android.gms:play-services-base:18.0.0"
    //okhttp covers okhttp, okio dependency
    implementation "com.squareup.okhttp3:okhttp:4.7.2"
    implementation "com.squareup.okhttp3:logging-interceptor:4.7.2"
    implementation "net.minidev:json-smart:2.4.11"
    //For TrustDefender
    implementation "commons-io:commons-io:2.13.0"
    implementation "commons-codec:commons-codec:1.16.0"
    //Nimbus
    implementation "com.nimbusds:nimbus-jose-jwt:8.2.1"
    implementation "com.google.code.gson:gson:2.8.5"
    implementation "androidx.lifecycle:lifecycle-process:2.5.1"
    implementation 'androidx.lifecycle:lifecycle-extensions:2.2.0'
    //Analytics Database
    implementation "androidx.room:room-runtime:2.4.3"
    implementation "androidx.room:room-ktx:2.4.3"
    kapt "androidx.room:room-compiler:2.4.3"
    //Instant apps
    implementation "com.google.android.gms:play-services-instantapps:18.0.0"
    //Play Integrity
    implementation "com.google.android.play:integrity:1.0.1"

    //If kotlin plugins are not added then below dependencies require to add to kotlin coroutines
    //used by SDK.
    implementation "org.jetbrains.kotlinx:kotlinx-coroutines-core:$any-latest-version"
    implementation "org.jetbrains.kotlinx:kotlinx-coroutines-android:$any-latest-version"
}
A Kotlin module needs additional Gradle dependencies. Add the following lines to android/build.gradle:
buildscript {
    ext {
        kotlin_version = "[version]" //(ex:1.6.0)
    }
    dependencies {
        classpath("org.jetbrains.kotlin:kotlin-gradle-plugin:$kotlin_version")
    }
}
Visa SDK Configuration Module
Configure the SDK with Unit's Visa App ID, b8186bd9-fcba-b77a-11e3-1c0d2e5a3501, which is shared across all Unit programs. Configure it only once in your app. If your app configures VisaInAppConfig more than once with the same parameters, nothing happens. With different parameters, the VDE SDK throws a VisaInAppConfigException and the configuration isn't updated.
Call configureSdk once when your app starts, before rendering any Unit component. On Android, Visa SDK 5.6 crashes the app if push provisioning is initialized before the SDK is configured.
iOS
Export a Swift Module
Create a .swift file named VdeSdkConfigurationModule:
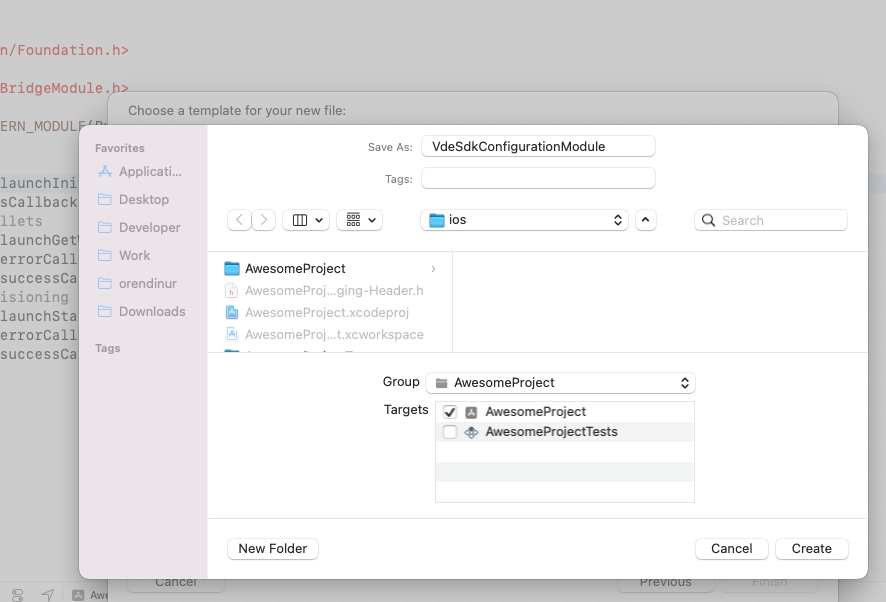
Agree to create a Bridging Header:
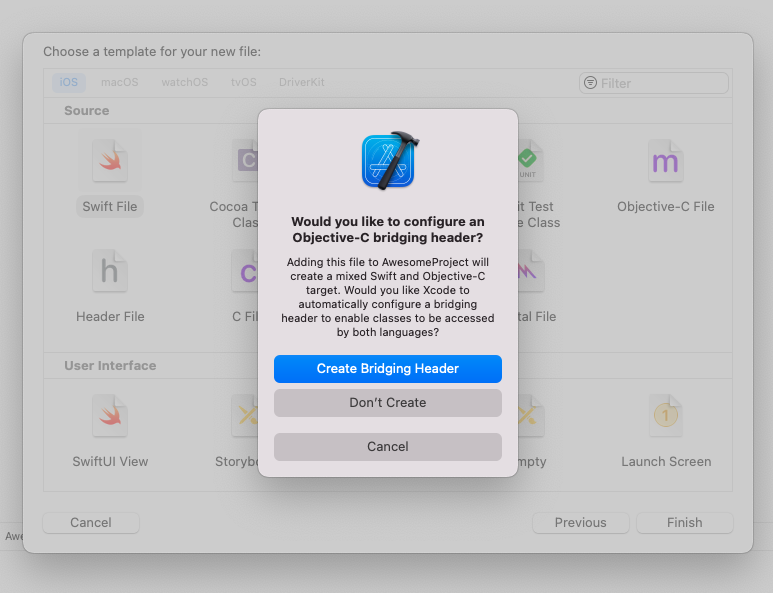
In the Bridge file:
#import <React/RCTBridgeModule.h>
In the .swift file:
//
//  VdeSdkConfigurationModule.swift
//

import Foundation
import VisaInAppModuleCore

@objc(VdeSdkConfigurationModule)
class VdeSdkConfigurationModule: NSObject {
  var configureSdkPromise: (resolve: RCTPromiseResolveBlock?, reject: RCTPromiseRejectBlock?)

  @objc static func requiresMainQueueSetup() -> Bool {
    return false
  }

  @objc
  func configureSdk(
    _ appId: String, environment: String, resolve: @escaping RCTPromiseResolveBlock,
    rejecter: @escaping RCTPromiseRejectBlock
  ) {
    configureSdkPromise.resolve = resolve
    configureSdkPromise.reject = rejecter
    let visaInAppConfig = VisaInAppConfig(
      environment: getEnvironment(environment: environment),
      appId: appId)
    do {
      try VisaInAppCore.configure(config: visaInAppConfig)
      configureSdkPromise.resolve?(["Success"])
    } catch {
      configureSdkPromise.reject?("configureSdk_error", "Failed to configure sdk", nil)
      print(error)
    }
  }

  // Get proper environment constant
  func getEnvironment(environment: String) -> VisaInAppEnvironment {
    if environment.lowercased().contains("prod") {
      return VisaInAppEnvironment.Production
    } else {
      return VisaInAppEnvironment.Sandbox
    }
  }
}
Create an empty Objective-C file with the same name, VdeSdkConfigurationModule, and add the following to expose the Swift methods to React Native:
//
//  VdeSdkConfigurationModule.m
//

#import <Foundation/Foundation.h>
#import <React/RCTBridgeModule.h>

@interface RCT_EXTERN_MODULE(VdeSdkConfigurationModule, NSObject)
RCT_EXTERN_METHOD(configureSdk: (NSString *)appId
                  environment: (NSString *)environment
                  resolve: (RCTPromiseResolveBlock)resolve
                  rejecter:(RCTPromiseRejectBlock)reject)

@end
Android
Create the Module
The module integrating the VDE SDK configuration methods is implemented as a native class inside the android folder, under the directory tree corresponding to the project name and package. For example: android/app/src/main/java/com/your-app-name/VDEConfigurationModule.kotlin
Create a Kotlin class named VdeSdkConfigurationModule:
class VdeSdkConfigurationModule (reactContext: ReactApplicationContext) : ReactContextBaseJavaModule(reactContext) {

  private lateinit var visaInAppConfig: VisaInAppConfig

  @ReactMethod
  fun configureSdk(appId: String = "b8186bd9-fcba-b77a-11e3-1c0d2e5a3501",
                   environment: String = "Production",
                   configureSdkPromise: Promise
  ){
    visaInAppConfig = VisaInAppConfig(getEnvironment(environment), appId)
    VisaInAppCore.configure(reactApplicationContext.applicationContext, visaInAppConfig)
    UiThreadUtil.runOnUiThread {
      // recognizes when the application is in the background or foreground.
      ProcessLifecycleOwner.get()
        .lifecycle
        .addObserver(VisaInAppCoreApplicationObserver())
    }
    configureSdkPromise.resolve("Success")
  }

  private fun getEnvironment(env: String): VisaInAppEnvironment {
    if (env.lowercase(Locale.ROOT).contains("prod")) {
      return VisaInAppEnvironment.Production
    }
    return VisaInAppEnvironment.Sandbox
  }

  override fun getName(): String {
    return "VdeSdkConfigurationModule"
  }
}
Register the Module
Next, register the native module with React Native by adding it to a ReactPackage. React Native calls createNativeModules() on a ReactPackage to get the list of native modules to register. On Android, a module that isn't instantiated and returned in createNativeModules isn't available from JavaScript.
To add the native module to a ReactPackage, create a new class named MyAppPackage that implements ReactPackage inside the android/app/src/main/java/com/your-app-name/ folder, and add the following code:
import android.view.View
import com.facebook.react.ReactPackage
import com.facebook.react.bridge.NativeModule
import com.facebook.react.bridge.ReactApplicationContext
import com.facebook.react.uimanager.ReactShadowNode
import com.facebook.react.uimanager.ViewManager

class MyAppPackage : ReactPackage {

    override fun createViewManagers(
        reactContext: ReactApplicationContext
    ): MutableList<ViewManager<View, ReactShadowNode<*>>> = mutableListOf()

    override fun createNativeModules(
        reactContext: ReactApplicationContext
    ): MutableList<NativeModule> {
        var modules: ArrayList<NativeModule> = ArrayList()
        modules.add(VdeSdkConfigurationModule(reactContext))
        return modules
    }
}
Then register the package in the list returned by ReactNativeHost's getPackages() method. In android/app/src/main/java/com/your-app-name/MainApplication.java, locate getPackages() and add your package to the list it returns:
  @Override
  protected List<ReactPackage> getPackages() {
    @SuppressWarnings("UnnecessaryLocalVariable")
    List<ReactPackage> packages = new PackageList(this).getPackages();
    // Packages that cannot be autolinked yet can be added manually here, for example:
    // packages.add(new MyReactNativePackage());
    packages.add(new MyAppPackage());

    return packages;
  }
Access the Module from JavaScript
To access your native module from JavaScript, first import NativeModules from React Native:
import { NativeModules } from 'react-native';
Then access the VdeSdkConfigurationModule native module from NativeModules and call configureSdk:
const { VdeSdkConfigurationModule } = NativeModules;

const configureSdk = async () => {
  try {
    const response = await VdeSdkConfigurationModule.configureSdk(AppId, "production");
  } catch (error) {
    console.error(error);
  }
};
Rebuild the iOS and Android projects before you access the native modules.
Visa SDK Push Provisioning Module
iOS
Export a Swift Module
Create a .swift file named PushProvisioningModule:
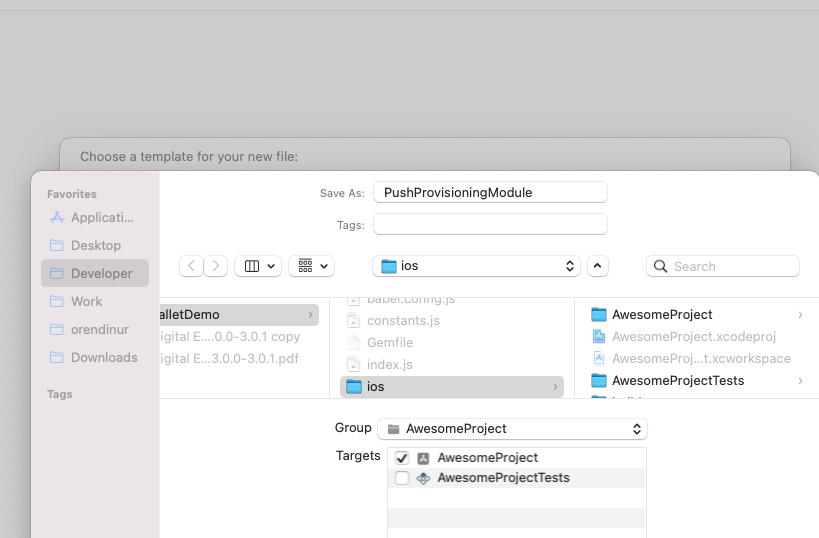
In the .swift file:
//
//  PushProvisioningModule.swift
//

import Foundation
import UIKit
import VisaPushProvisioning

@objc(PushProvisioningModule)
class PushProvisioningModule: NSObject, VisaPushProvisioningListener {

  var provisioningInterface: VisaPushProvisioningInterface?
  var APPLE_WALLET_CODE = "ApplePayPushProvision"

  var launchInitializePromise: (resolve: RCTPromiseResolveBlock?, reject: RCTPromiseRejectBlock?)
  var launchGetWalletsPromise: (resolve: RCTPromiseResolveBlock?, reject: RCTPromiseRejectBlock?)
  var launchStartCardProvisioningPromise:
    (resolve: RCTPromiseResolveBlock?, reject: RCTPromiseRejectBlock?)

  @objc
  static func requiresMainQueueSetup() -> Bool {
    return false
  }

  // SDK Initialize
  @objc
  func launchInitialize(
    _ resolve: @escaping RCTPromiseResolveBlock, rejecter: @escaping RCTPromiseRejectBlock
  ) {
    launchInitializePromise.resolve = resolve
    launchInitializePromise.reject = rejecter
    provisioningInterface =
      VisaPushProvisioningInterfaceFactory.createPushProvisioningInterface(listener: self)
    provisioningInterface?.initialize()
  }

  // Get Eligible Wallets
  @objc
  func launchGetWallets(
    _ params: String, resolve: @escaping RCTPromiseResolveBlock,
    rejecter: @escaping RCTPromiseRejectBlock
  ) {
    launchGetWalletsPromise.resolve = resolve
    launchGetWalletsPromise.reject = rejecter
    // convert JSON param
    if let data = params.data(using: .utf8) {
      do {
        if let args = try JSONSerialization.jsonObject(with: data, options: []) as? [String: Any],
          let encPayload = args["encPayload"] as? String
        {
          let request = VPSupportedWalletRequest(encPayload: encPayload)
          provisioningInterface?.getSupportedWallets(request: request)
        }
      } catch {
        print(error.localizedDescription)
      }
    }
  }

  // Start Card Provisioning
  @objc
  func launchStartCardProvisioning(
    _ params: String, resolve: @escaping RCTPromiseResolveBlock,
    rejecter: @escaping RCTPromiseRejectBlock
  ) {
    launchStartCardProvisioningPromise.resolve = resolve
    launchStartCardProvisioningPromise.reject = rejecter
    //     convert JSON param
    if let data = params.data(using: .utf8) {
      do {
        if let args = try JSONSerialization.jsonObject(with: data, options: []) as? [String: Any],
          let walletCode = args["walletCode"] as? String,
          let walletName = args["walletName"] as? String
        {
          let code =
            walletCode == APPLE_WALLET_CODE
            ? VPSupportedWalletCode.ApplePayPushProvision : VPSupportedWalletCode.VCEHPushProvision
          let request = VPCardProvisioningRequest(walletCode: code, walletName: walletName)
          guard let window = UIApplication.shared.delegate?.window as? UIWindow,
            let rootViewController = window.rootViewController
          else {
            return
          }
          provisioningInterface?.startCardProvisioning(
            request: request,
            initialView: rootViewController)
        }
      } catch {
        print(error.localizedDescription)
      }
    }
  }

  // Success callback after SDK initialize method call
  func initializationSuccess(
    pushProvisioningInterface: VisaPushProvisioningInterface,
    response:
      VPInitResponse
  ) {

    launchInitializePromise.resolve?([response.toJsonString() as Any])
  }
  // Failure callback after SDK initialize method call
  func initializationFailure(
    pushProvisioningInterface: VisaPushProvisioningInterface,
    error:
      VPError
  ) {
    launchInitializePromise.reject?("initializationFailure", error.toJsonString(), nil)
  }

  // Success callback after SDK getSupportedWallets method call
  func supportedWalletSuccess(
    pushProvisioningInterface: VisaPushProvisioningInterface,
    response: VPSupportedWalletResponse
  ) {
    launchGetWalletsPromise.resolve?([response.toJsonString() as Any])
  }
  // Failure callback after SDK getSupportedWallets method call
  func supportedWalletFailure(
    pushProvisioningInterface: VisaPushProvisioningInterface,
    error:
      VPError
  ) {
    launchGetWalletsPromise.reject?("supportedWalletFailure", error.toJsonString(), nil)
  }

  // Success callback after SDK startCardProvisioning method call
  func cardProvisioningSuccess(
    pushProvisioningInterface: VisaPushProvisioningInterface,
    response: VPCardProvisioningResponse
  ) {
    launchStartCardProvisioningPromise.resolve?([response.toJsonString() as Any])
  }
  // Failure callback after SDK startCardProvisioning method call
  func cardProvisioningFailure(
    pushProvisioningInterface: VisaPushProvisioningInterface,
    error:
      VPError
  ) {
    launchStartCardProvisioningPromise.reject?("cardProvisioningFailure", error.toJsonString(), nil)
  }
}
Create an empty Objective-C file with the same name, PushProvisioningModule, and add the following to expose the Swift methods to React Native:
//
//  PushProvisioningModule.m
//

#import <Foundation/Foundation.h>
#import <React/RCTBridgeModule.h>
@interface RCT_EXTERN_MODULE(PushProvisioningModule, NSObject)
    // SDK Initialize
    RCT_EXTERN_METHOD(launchInitialize: (RCTPromiseResolveBlock)resolve
                      rejecter: (RCTPromiseRejectBlock)reject)

    // Get Eligible Wallets
    RCT_EXTERN_METHOD(launchGetWallets: (NSString *)params
                      resolve: (RCTPromiseResolveBlock)resolve
                      rejecter:(RCTPromiseRejectBlock)reject)

    // Start Card Provisioning
    RCT_EXTERN_METHOD(launchStartCardProvisioning: (NSString *)params
                      resolve: (RCTPromiseResolveBlock)resolve
                      rejecter:(RCTPromiseRejectBlock)reject)
@end
Android
Create the Module
Create a Kotlin class named PushProvisioningModule that holds a reference to VisaPushProvisioningInterface and exposes the SDK's initialize, getSupportedWallets, and startCardProvisioning methods with their result handling:
class PushProvisioningModule (reactContext: ReactApplicationContext) : ReactContextBaseJavaModule(reactContext),
  VisaPushProvisioningListener {

  private lateinit var visaPushProvisioningInterface: VisaPushProvisioningInterface
  private lateinit var launchInitializePromise: Promise
  private lateinit var launchGetWalletsPromise: Promise
  private lateinit var launchStartCardProvisioningPromise: Promise
  private lateinit var gson: Gson

  override fun getName(): String {
    return "PushProvisioningModule"
  }

  @ReactMethod
  fun launchInitialize(promise: Promise) {
    gson = Gson()
    this.launchInitializePromise = promise
    visaPushProvisioningInterface =
      VisaPushProvisioningInterfaceFactory.createPushProvisioningInterface(
        this)
    visaPushProvisioningInterface.initialize()
  }

  @ReactMethod
  fun launchGetWallets(params: String, promise: Promise){
    this.launchGetWalletsPromise = promise
    visaPushProvisioningInterface.getSupportedWallets(gson.fromJson(params,
      VPSupportedWalletRequest::class.java))
  }

  @ReactMethod
  fun launchStartCardProvisioning(params: String, promise: Promise){
    this.launchStartCardProvisioningPromise = promise
    visaPushProvisioningInterface.startCardProvisioning(reactApplicationContext.applicationContext,
      gson.fromJson(params, VPCardProvisioningRequest::class.java))
  }

  override fun initializationFailure(
    pushProvisioningInterface: VisaPushProvisioningInterface,
    error: VPError
  ) {
    this.launchInitializePromise.reject("initializationFailure", gson.toJson(error));

  }

  override fun initializationSuccess(
    pushProvisioningInterface: VisaPushProvisioningInterface,
    response: VPInitResponse
  ) {
    Log.d("PushProvisioningModule", "initialization success, got signedNonce")
    this.launchInitializePromise.resolve(gson.toJson(response));
  }

  override fun supportedWalletFailure(
    pushProvisioningInterface: VisaPushProvisioningInterface,
    error: VPError
  ) {
    Log.d("PushProvisioningModule", "initialization failed")
    this.launchGetWalletsPromise.reject("supportedWalletFailure", gson.toJson(error));
  }

  override fun supportedWalletSuccess(
    pushProvisioningInterface: VisaPushProvisioningInterface,
    response: VPSupportedWalletResponse
  ) {
    this.launchGetWalletsPromise.resolve(gson.toJson(response));
  }

  override fun cardProvisioningFailure(
    pushProvisioningInterface: VisaPushProvisioningInterface,
    error: VPError
  ) {
    this.launchStartCardProvisioningPromise.reject("cardProvisioningFailure", gson.toJson(error));

  }

  override fun cardProvisioningSuccess(
    pushProvisioningInterface: VisaPushProvisioningInterface,
    response: VPCardProvisioningResponse
  ) {
    this.launchStartCardProvisioningPromise.resolve(gson.toJson(response));
  }
}
Register the Module
Add the following line to the MyAppPackage class, just as you did for the VdeSdkConfigurationModule:
modules.add(PushProvisioningModule(reactContext))
Access the Module from JavaScript
Access the PushProvisioningModule native module from NativeModules:
import { NativeModules } from 'react-native';

const { PushProvisioningModule } = NativeModules;
You can then call its native methods. The encryptedPayload you pass to launchGetWallets comes from Unit's Get Mobile Wallet Payload API:
// Calls the SDK's initialize method
const launchInitialize = async () => {
  try {
    const response = await PushProvisioningModule.launchInitialize();
  } catch (error) {
    // Manage errors
  }
};

// Calls the SDK's getSupportedWallets method
const launchGetWallets = async () => {
  try {
    const response = await PushProvisioningModule.launchGetWallets(
      JSON.stringify({
        encPayload: encryptedPayload,
      })
    );
  } catch (error) {
    // Manage errors
  }
};

// Calls the SDK's startCardProvisioning method
const launchStartCardProvisioning = async () => {
  try {
    const response = await PushProvisioningModule.launchStartCardProvisioning(
      JSON.stringify({
        walletCode: walletCode,
        walletName: walletDescription,
      })
    );
  } catch (error) {
    // Manage errors
  }
};
React Native Sample App
The sample app shows how to integrate Visa's SDK into your app.
Before running the sample app:
- Get the
UnitWalletDemoproject from your Customer Success Manager, then open it in your code editor. - Open the
constantsfile undersrc/shared. - Set the
UNIT_CONSTANTSvariable to your Unit card ID and customer token:
export const UNIT_CONSTANTS = {
    CARD_ID: <YOUR_CARD_ID>,
    CUSTOMER_TOKEN: <YOUR_CUSTOMER_TOKEN>
}
- Set the
VISA_CONSTANTSvariable to Unit's Visa App ID,b8186bd9-fcba-b77a-11e3-1c0d2e5a3501:
export const VISA_CONSTANTS = {
    APP_ID: <YOUR_VISA_APP_ID>
}
- For iOS only: in the
iosfolder, runpod installfrom the command line, then complete the iOS steps in Add the Visa SDK.
To run the sample app:
- Start Metro, using npm:
npm start
Or, using yarn:
yarn start
- Start your application by running it directly from within Xcode or Android Studio.
After the app starts, you should see a button that launches the push provisioning flow when tapped. See the logs printed in your terminal for more details.