
Android Push Provisioning
This page covers everything you need to add the Add to Google Wallet button to a native Android app. Native Android apps support Google Wallet only. By the end, end customers can add their card to Google Wallet from your app, and your app is ready for release. Before you start, make sure tokenization is live on your Bank Identification Number (BIN) and you've confirmed a build path with your Customer Success Manager.
Part 1: Requirements
Google Wallet
To add cards to Google Wallet from your app, your program needs its own profile in the Google Issuer Console, Google's portal for card issuers. Visa connects your program to Google on your behalf, so you complete Google's onboarding up to the key exchange, submit one intake request, and send Unit your app details. Unit handles the remaining steps.
Step 1: Create a Google Issuer Console Profile
Create your own Google Issuer Console profile by following the steps outlined in Google's Get Started page.
When the profile setup asks for your Visa BID (Business ID, Visa's identifier for the bank that issues your cards), enter the BID for your bank partner:
| Bank partner | Visa BID |
|---|---|
| Thread Bank | 10034854 |
| i3 Bank | 10006981 |
If you're not sure which bank partner issues your cards, ask your Customer Success Manager.
Step 2: Add Unit as a Technical Contact (Card Component Only)
If you're using the Card component, add cardops@unit.co as a technical contact on your profile. Google has already approved the Card component's screens, so Unit completes Google's launch process for you.
If you're building a custom integration, skip this step. Your team completes Google's launch process directly in the Issuer Console.
Step 3: Complete Onboarding Through the Key Exchange
- Navigate to the Google Issuer Console.
- Complete the first four steps of Issuer Console onboarding, including Google's Non-Disclosure Agreement (NDA) and Click to Accept (CTA) agreement.
Because Visa connects your program to Google, you don't upload keys in the Issuer Console. When Google requests a key exchange, complete the Unified Push Provisioning API Intake Request instead.
On the intake request, enter these values:
- Type of Request: Aggregator/Program Manager linking
- Network: Visa
- Aggregator Merchant ID:
BCR2DN4TXL64HAC5
Google confirms when the setup is complete.
Step 4: Send Unit Your App Details
Once Google confirms your intake request, send your Customer Success Manager:
- Merchant ID: Your Merchant ID from the Issuer Console.
- App package: Your Android app's package name.
- Provisioning model: By default, Google Wallet stores both a device token, which stands in for the card during payments, and the underlying card number, which lets end customers spend online and on devices that can't create a device token. You can keep both, or choose the device token only.
Unit shares these with Visa so Visa can link your app to your card program.
Requirements Complete
Once you've sent Unit your app details, Unit sets up push provisioning with Visa, which typically takes 10–20 business days. Your Customer Success Manager will let you know when setup is complete and your developers can start the integration.
Part 2: Integration
Start once Unit confirms that setup with Visa is complete. The Card component runs on Visa's Digital Enablement (VDE) SDK. A custom integration uses the Unit Push Provisioning SDK, Unit's software development kit (SDK), which wraps Visa's SDK and runs the Add to Wallet flow for you.
Choose your build path:
- Card component: Complete Add the VDE SDK in the Visa SDK section below, then follow Add Card to Wallet in the Card component guide. Then continue to Part 3: Test and Launch.
- Custom integration: You build your own card screen and Add to Wallet button, and your app calls the Unit Push Provisioning SDK directly. Follow Unit Push Provisioning SDK below, then return to Part 3: Test and Launch.
Part 3: Test and Launch
- Device: Test on a physical Android device with Google Wallet installed and updated to its latest version. Emulators aren't supported.
- Google's launch approval: Before Google Wallet push provisioning goes live, Google requires a user experience (UX) review, test case submission, and launch approval in the Issuer Console. Google's approval typically takes about a month.
- Card component: Unit completes this process for you, using the technical contact access you granted in Step 2.
- Custom integration: Your team completes this process in the Issuer Console.
- Release: Once your Customer Success Manager confirms that Google has approved your launch, release your app through the Google Play Store.
Unit Push Provisioning SDK
This section is for the custom integration build path. The Unit Push Provisioning SDK is Unit's Android SDK for adding cards to Google Wallet. It wraps Visa's Digital Enablement (VDE) SDK, so your app works with Unit's SDK rather than calling Visa's SDK directly. See the Changelog for what's new in each version.
Requirements
- Android: Android 9 (API 28) or later, the minimum of the Visa 5.12.0 SDK.
- Visa SDK: Visa Digital Enablement (VDE) SDK 5.12.0. The Visa libraries you add must be this version, and Unit provides them.
- Device: A physical device with Google Wallet installed. Push provisioning doesn't run on an emulator.
You'll also need:
- Unit's Visa App ID,
b8186bd9-fcba-b77a-11e3-1c0d2e5a3501, which is shared across all Unit programs. - A Unit customer token with the
cardsscope, and the card ID to provision.
Installation
Step 1: Add the Unit Push Provisioning SDK
Add the SDK to your app's build.gradle. It's published to Maven Central:
dependencies {
    implementation 'co.unit:unit-push-provisioning:5.12.0'
}
The SDK is also included in the Unit SDK (co.unit:unit-sdk) from version 1.1.0, as UnitSDK.manager.pushProvisioning.
Step 2: Add the Visa SDK
Copy the following libraries from the Visa SDK package provided by Unit into your app's libs folder:
VisaPushProvisioning-5.12.0.aarVisaInAppCore-5.12.0.aarTMXProfiling-8.0-82.aarTMXProfilingConnections-8.0-82.aarplay-services-tapandpay-18.8.0.aar
Then declare them, with the open-source libraries the Visa SDK needs:
android {
    defaultConfig {
        minSdkVersion 28
    }
}

dependencies {
    // Visa Digital Enablement SDK
    implementation files('libs/VisaPushProvisioning-5.12.0.aar')
    implementation files('libs/VisaInAppCore-5.12.0.aar')
    implementation files('libs/TMXProfiling-8.0-82.aar')
    implementation files('libs/TMXProfilingConnections-8.0-82.aar')

    // Google Pay
    implementation files('libs/play-services-tapandpay-18.8.0.aar')
    implementation 'com.google.android.gms:play-services-basement:18.9.0'

    // Open-source libraries used by the Visa SDK
    implementation 'com.squareup.okhttp3:okhttp:4.9.2'
    implementation 'com.squareup.okhttp3:logging-interceptor:4.9.2'
    implementation 'net.minidev:json-smart:2.6.0'
    implementation 'commons-io:commons-io:2.6'
    implementation 'commons-codec:commons-codec:1.13'
    implementation 'com.nimbusds:nimbus-jose-jwt:10.4.2'
    implementation 'androidx.lifecycle:lifecycle-extensions:2.2.0'
    implementation 'androidx.lifecycle:lifecycle-viewmodel-ktx:2.4.0'
    implementation 'androidx.lifecycle:lifecycle-livedata-ktx:2.4.0'
    implementation 'androidx.constraintlayout:constraintlayout:1.1.3'
    implementation platform('androidx.compose:compose-bom:2024.09.01')
    implementation 'androidx.compose.runtime:runtime'
    implementation 'androidx.compose.ui:ui'
    implementation 'androidx.room:room-runtime:2.6.1'
    implementation 'androidx.room:room-ktx:2.6.1'
    implementation 'com.google.android.play:integrity:1.4.0'
}
If the Visa SDK is missing or the wrong version, the SDK reports it through the error callback.
Implementation
The Manager
All calls go through UnitPushProvisioningSDK.manager. Every method is available as a Kotlin call and with a completion handler: configure is synchronous and throws, and walletStatus and startCardProvisioning are suspend functions. Completion handlers are called on the main thread. Each example below shows both styles.
Configure
Configure the SDK once, when your app starts, for example in your Application.onCreate. Pass the environment and Unit's Visa App ID. The same environment is used for both Unit and Visa. Push provisioning is set up and tested in production only, so use UNEnvironment.Production to add real cards:
- throws
- Completion handler
import co.unit.core.networking.UNEnvironment
import co.unit.pushprovisioning.sdkApi.UnitPushProvisioningSDK
import co.unit.pushprovisioning.sdkApi.models.UNPushProvisioningError

try {
    UnitPushProvisioningSDK.manager.configure(
        environment = UNEnvironment.Production,  // UNEnvironment.Production or UNEnvironment.Sandbox
        visaAppId = "b8186bd9-fcba-b77a-11e3-1c0d2e5a3501"
    )
} catch (error: UNPushProvisioningError) {
    Log.e(TAG, error.message)
}
import co.unit.core.networking.UNEnvironment
import co.unit.pushprovisioning.sdkApi.UnitPushProvisioningSDK

UnitPushProvisioningSDK.manager.configure(
    environment = UNEnvironment.Production,  // UNEnvironment.Production or UNEnvironment.Sandbox
    visaAppId = "b8186bd9-fcba-b77a-11e3-1c0d2e5a3501"
) { result ->
    result.onFailure { error -> Log.e(TAG, error.message.orEmpty()) }
}
Visa keeps the first environment it is configured with until the app restarts. Configure the SDK with the environment you will provision in. Calling configure again with a different environment fails.
Set the Customer Token
Set the customer token once, before checking the wallet status or adding a card. The SDK uses it to call Unit's Get Mobile Wallet Payload API for you. Set it again whenever the token changes, for example after it is refreshed:
UnitPushProvisioningSDK.manager.customerToken = customerToken
The token is kept in memory only, and is shared with the other Unit SDKs in your app.
Check Wallet Status
You can check whether the card can be provisioned on this device, for example to decide whether to show an "Add to Google Wallet" button:
- suspend
- Completion handler
lifecycleScope.launch {
    try {
        val status = UnitPushProvisioningSDK.manager.walletStatus(cardId = cardId)
        when (status) {
            VPProvisionStatus.ReadyToProvision -> {} // show the Add to Google Wallet button
            VPProvisionStatus.AlreadyProvisioned,
            VPProvisionStatus.AlreadyProvisionedAndSetAsDefault -> {} // the card is already in the wallet
            else -> {} // not available: hide the button
        }
    } catch (error: UNPushProvisioningError) {
        Log.e(TAG, error.message)
    }
}
UnitPushProvisioningSDK.manager.walletStatus(cardId = cardId) { result ->
    result
        .onSuccess { status ->
            val showButton = status == VPProvisionStatus.ReadyToProvision
        }
        .onFailure { error -> Log.e(TAG, error.message.orEmpty()) }
}
A card that was added to Google Wallet but still waits for identity verification is reported as ReadyToProvision, so the end customer can complete the verification by adding it again.
Add the Card to the Wallet
When the end customer taps your "Add to Google Wallet" button, start provisioning. The SDK opens Google Wallet's add-card flow and returns the resulting status for this device:
- suspend
- Completion handler
lifecycleScope.launch {
    try {
        val status = UnitPushProvisioningSDK.manager.startCardProvisioning(cardId = cardId)
        // update the button according to the status
    } catch (error: UNPushProvisioningError) {
        Log.e(TAG, error.message)
    }
}
UnitPushProvisioningSDK.manager.startCardProvisioning(cardId = cardId) { result ->
    result
        .onSuccess { status -> Log.d(TAG, status.toString()) }
        .onFailure { error -> Log.e(TAG, error.message.orEmpty()) }
}
If Google Pay is not available for the card, startCardProvisioning returns NotAvailable without opening Google Wallet.
Calls run one at a time. Cancelling a call's coroutine does not stop a Visa flow that has already started; the next call waits for it to finish.
Show the button according to Google's branding guidelines, which Google reviews as part of Part 3: Test and Launch.
Handling Errors
Every method throws a UNPushProvisioningError, or delivers it as the completion handler's failure. Match on its reason to decide what to do, and log its message, which includes the operation and the details:
lifecycleScope.launch {
    try {
        val status = UnitPushProvisioningSDK.manager.walletStatus(cardId = cardId)
    } catch (error: UNPushProvisioningError) {
        when (error.reason) {
            UNPushProvisioningError.Reason.MissingCustomerToken -> {} // set the customer token and try again
            UNPushProvisioningError.Reason.NetworkFailed -> {} // show a "try again" message
            else -> {}
        }
        Log.e(TAG, error.message) // e.g. "Error in walletStatus: the Unit API request failed (HTTP 401: ...)"
    }
}
Error Callback
Some errors are not the result of a call you made, so there is nothing to throw them from. Register a callback to receive them:
UnitPushProvisioningSDK.manager.addErrorCallback { error ->
    when (error.reason) {
        UNPushProvisioningError.Reason.VisaSDKMissing -> {} // add the Visa SDK libraries to your app
        UNPushProvisioningError.Reason.UnsupportedVisaVersion -> {} // add the supported Visa SDK version
        else -> {} // for example, a failed call made by the Components SDK
    }
    Log.e(TAG, error.message)
}
The callback is called on the main thread. You can register more than one. Errors found when your app starts are also delivered to callbacks you register later.
Errors thrown from a call you make yourself are not repeated in the callback.
Types
UNPushProvisioningError
| Property | Type | Description |
|---|---|---|
| operation | UNPushProvisioningError.Operation | The call or check that failed. |
| reason | UNPushProvisioningError.Reason | Why it failed. Match on this to handle errors. |
| details | String? | Specifics for logs and support, such as the Hypertext Transfer Protocol (HTTP) status and response body. Not meant for matching; the text can change. |
| message | String | A description that includes the operation, reason, and details. |
| cause | Throwable? | The original error, for example a UNNetworkError, an IOException, or a Visa exception. |
UNPushProvisioningError.Operation
| Case | Meaning |
|---|---|
| Configure | configure(environment, visaAppId) |
| WalletStatus | walletStatus(cardId) |
| StartCardProvisioning | startCardProvisioning(cardId) |
| RequirementsCheck | The checks the SDK runs when your app starts. Reported through the error callback. |
UNPushProvisioningError.Reason
| Case | When |
|---|---|
| NotConfigured | configure wasn't called, or didn't succeed. |
| MissingCustomerToken | No customer token is set. |
| NetworkFailed | The Unit API request failed, for example an invalid or expired customer token, an unknown card ID, or no connection. |
| VisaFailed | The Visa SDK reported a failure, including rejecting the configuration. |
| VisaSDKMissing | The Visa SDK libraries are not in your app. Reported through the error callback, and thrown by configure. |
| UnsupportedVisaVersion | The Visa SDK in your app is not version 5.12. details includes the version found. Reported through the error callback. |
| InternalError | Any other failure. |
UNEnvironment
| Case | Meaning |
|---|---|
| Production | Unit's production API and Visa's production environment. |
| Sandbox | Unit's sandbox API and Visa's sandbox environment. |
Completion and Callback Types
typealias UNPushProvisioningCompletion = (Result<Unit>) -> Unit
typealias UNPushProvisioningStatusCompletion = (Result<VPProvisionStatus>) -> Unit
typealias UNPushProvisioningErrorCallback = (UNPushProvisioningError) -> Unit
Changelog
5.12.0 (Nov 19, 2026)
- Initial release of the Unit Android Push Provisioning SDK —
configure,walletStatus,startCardProvisioning, and an error callback, wrapping Visa Digital Enablement SDK 5.12.0.
Visa SDK for the Card Component
This section is for the Card component build path, which runs on Visa's Digital Enablement (VDE) SDK version 5.6.0, not the 5.12.0 version the Unit Push Provisioning SDK uses. Complete Add the VDE SDK. The Card component guide links to the Add to Wallet Flow below for an overview of the calls it makes.
Add the VDE SDK
Requirements
Your app and test devices must meet these requirements:
- Android OS: The minimum Android Operating System (OS) validated for use with the VDE SDK is 9.0 (Pie).
- Huawei Devices: Because of Google's libraries and U.S. government regulations, the Android VDE SDK cannot function on certain Huawei devices.
- Android SDK API: The minimum supported version is 28, and the target version is 32.
- Kotlin: The minimum supported version is 1.7.0.
- Java: The minimum supported version is 11.
- Device: The SDK runs only on a physical Android device. Emulators aren't supported.
- Wallets: The wallets you'll add cards to must be installed on the device and updated to their latest versions.
Add the VDE SDK to Your Project
-
Get the Visa SDK package from Unit, which includes the following dependencies:
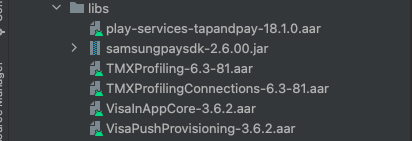
VisaPushProvisioning-5.6.0.aarVisaInAppCore-5.6.0.aarTMXProfiling-8.0-82.aarTMXProfilingConnections-8.0-82.aarplay-services-tapandpay-18.4.3.aar
-
Add the dependencies from the previous step under the
libsfolder of your project:- In Android Studio, switch your folder structure from Android to Project.
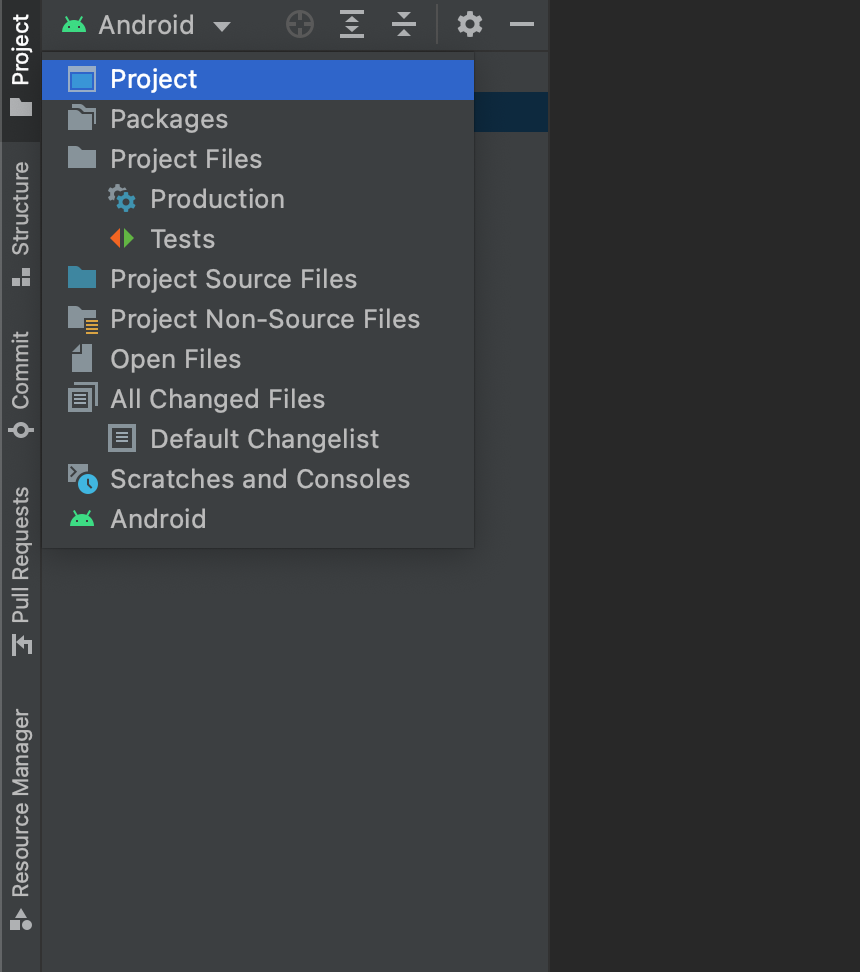
- Find the
libsfolder inside theappfolder.
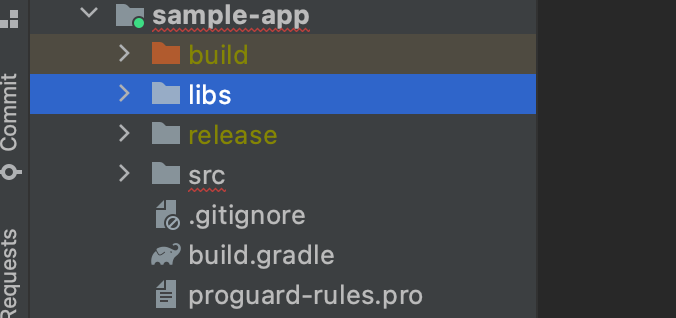
- Paste the dependencies inside the
libsfolder.
- If the
libsfolder doesn't exist, create it:- Make sure the folder structure is set to Project.
- Right-click your app name in the directory tree, go to "New" ⇒ "Directory", and name it "libs".
-
Declare the following Gradle dependencies, including the open source dependencies listed:
//Only if App is developed in kotlin and using kotlin-plugins for development then below can be
//used for kotlin coroutines dependencies as well, no need to add separate dependency.
plugins {
    id 'com.android.application'
    id 'org.jetbrains.kotlin.android'
    id 'kotlin-android-extensions'
    id 'kotlin-kapt'
}

dependencies {
    //In-App Provisioning SDK
    implementation files('libs/VisaPushProvisioning-5.6.0.aar')
    implementation files('libs/VisaInAppCore-5.6.0.aar')
    implementation files('libs/TMXProfiling-8.0-82.aar')
    implementation files('libs/TMXProfilingConnections-8.0-82.aar')
    //Google Wallet
    implementation files('libs/play-services-tapandpay-18.4.3.aar')
    implementation "com.google.guava:guava:33.2.1-android"
    implementation "com.google.android.gms:play-services-base:18.0.0"
    //okhttp covers okhttp, okio dependency
    implementation "com.squareup.okhttp3:okhttp:4.7.2"
    implementation "com.squareup.okhttp3:logging-interceptor:4.7.2"
    implementation "net.minidev:json-smart:2.4.11"
    //For TrustDefender
    implementation "commons-io:commons-io:2.13.0"
    implementation "commons-codec:commons-codec:1.16.0"
    //Nimbus
    implementation "com.nimbusds:nimbus-jose-jwt:8.2.1"
    implementation "com.google.code.gson:gson:2.8.5"
    implementation "androidx.lifecycle:lifecycle-process:2.5.1"
    implementation 'androidx.lifecycle:lifecycle-extensions:2.2.0'
    //Analytics Database
    implementation "androidx.room:room-runtime:2.4.3"
    implementation "androidx.room:room-ktx:2.4.3"
    kapt "androidx.room:room-compiler:2.4.3"
    //Instant apps
    implementation "com.google.android.gms:play-services-instantapps:18.0.0"
    //Play Integrity
    implementation "com.google.android.play:integrity:1.0.1"

    //If kotlin plugins are not added then below dependencies require to add to kotlin coroutines
    //used by SDK.
    implementation "org.jetbrains.kotlinx:kotlinx-coroutines-core:$any-latest-version"
    implementation "org.jetbrains.kotlinx:kotlinx-coroutines-android:$any-latest-version"
}
Add to Wallet Flow
The steps below walk through each call in the Add to Wallet flow, in order.
Step 1: Hold a Reference to VisaPushProvisioningInterface
var pushProvisioningInterface: VisaPushProvisioningInterface? = null
Step 2: Initialize the VisaPushProvisioningInterface Instance and Implement the VisaPushProvisioningListener Interface in Your Class
Initialize the VisaPushProvisioningInterface instance in the init() method of your class:
//'this' is the object that implements VisaPushProvisioningListener
pushProvisioningInterface = VisaPushProvisioningInterfaceFactory.createPushProvisioningInterface(this)
Declare the VisaPushProvisioningListener methods, which you'll implement in the following steps:
override fun initializationSuccess(
    pushProvisioningInterface: VisaPushProvisioningInterface,
    response: VPInitResponse
) { }

override fun initializationFailure(
    pushProvisioningInterface: VisaPushProvisioningInterface,
    error: VPError
) { }

override fun cardProvisioningSuccess(
    pushProvisioningInterface: VisaPushProvisioningInterface,
    response: VPCardProvisioningResponse
) { }

override fun cardProvisioningFailure(
    pushProvisioningInterface: VisaPushProvisioningInterface,
    error: VPError
) { }

override fun supportedWalletSuccess(
    pushProvisioningInterface: VisaPushProvisioningInterface,
    response: VPSupportedWalletResponse
) { }

override fun supportedWalletFailure(
    pushProvisioningInterface: VisaPushProvisioningInterface,
    error: VPError
) { }
Step 3: Initialize the Visa SDK and Get the signedNonce
Call the initialize() method:
pushProvisioningInterface?.initialize()
Handle the initialization callbacks of the VisaPushProvisioningListener:
override fun initializationSuccess(
    pushProvisioningInterface: VisaPushProvisioningInterface,
    response: VPInitResponse
) {
    val signedNonce = response.signedNonce
}

override fun initializationFailure(
    pushProvisioningInterface: VisaPushProvisioningInterface,
    error: VPError
) {
    //handle error
}
Step 4: Get the Wallet Payload from the Unit API
Retrieve the card's encrypted wallet payload from Unit's Get Mobile Wallet Payload API, using the signedNonce from Step 3.
Step 5: Get Supported Wallets
Call the getSupportedWallets(request: VPSupportedWalletRequest) method using the payload from Step 4:
val vpSupportedWalletRequest = VPSupportedWalletRequest(payload)
pushProvisioningInterface?.getSupportedWallets(vpSupportedWalletRequest)
Handle the getSupportedWallets callbacks of the VisaPushProvisioningListener. Keep the Google Wallet entry you'll provision to, and use its token status to decide whether to show the Add to Wallet button:
private var googleWallet: VPSupportedWallet? = null

// A token waiting for identity verification reports AlreadyProvisioned but can't be used yet
private fun VPToken?.canAddToWallet(): Boolean =
    this?.tokenStatus == VPTokenStatus.GoogleTokenStateNeedsIdentityVerification ||
        this?.provisionStatus == VPProvisionStatus.ReadyToProvision

override fun supportedWalletSuccess(
   pushProvisioningInterface: VisaPushProvisioningInterface,
   response: VPSupportedWalletResponse
) {
   googleWallet = response.wallets.firstOrNull {
      it.code == VPSupportedWalletCode.GooglePayPushProvision
   }
   val showButton = googleWallet?.tokens?.firstOrNull().canAddToWallet()
   // Show or hide the Add to Wallet button based on showButton
}

override fun supportedWalletFailure(
   pushProvisioningInterface: VisaPushProvisioningInterface,
   error: VPError
) {
   // handle error
}
A token that's waiting for identity verification is reported as AlreadyProvisioned but can't be used yet. Check GoogleTokenStateNeedsIdentityVerification first, as canAddToWallet() does, so the button stays visible and the end customer can finish verification.
Step 6: Start Card Provisioning
Call the startCardProvisioning(context: Context, request: VPCardProvisioningRequest) method with the wallet you kept in Step 5:
googleWallet?.let { wallet ->
    val request = VPCardProvisioningRequest(wallet.code, wallet.name)
    pushProvisioningInterface?.startCardProvisioning(context, request)
}
Handle the startCardProvisioning callbacks of the VisaPushProvisioningListener:
override fun cardProvisioningSuccess(
    pushProvisioningInterface: VisaPushProvisioningInterface,
    response: VPCardProvisioningResponse
) {
    val showButton = response.tokens.firstOrNull().canAddToWallet()
    // Update the UI, e.g. hide the button when showButton is false
}

override fun cardProvisioningFailure(
    pushProvisioningInterface: VisaPushProvisioningInterface,
    error: VPError
) {
    // handle error
}