
iOS Push Provisioning
This page covers everything you need to add the Add to Apple Wallet button to a native iOS app. Native iOS apps support Apple Wallet only. By the end, end customers can add their card to Apple Wallet from your app, and your app is ready for release. Before you start, make sure tokenization is live on your Bank Identification Number (BIN) and you've confirmed a build path with your Customer Success Manager.
Part 1: Requirements
Apple Wallet
Apple Wallet push provisioning requires an entitlement, a permission Apple grants your app to add cards to Apple Wallet. This is separate from Apple's Program Review, the one-time review that enables manual provisioning.
Step 1: Request the Apple Pay In-App Provisioning Entitlement
- Request Apple Pay In-App Provisioning for your app through Apple's In-App Provisioning Submission Form.
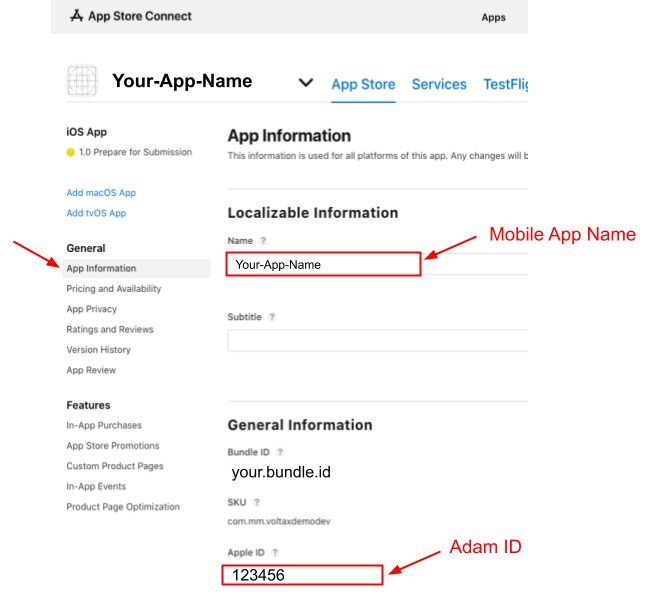
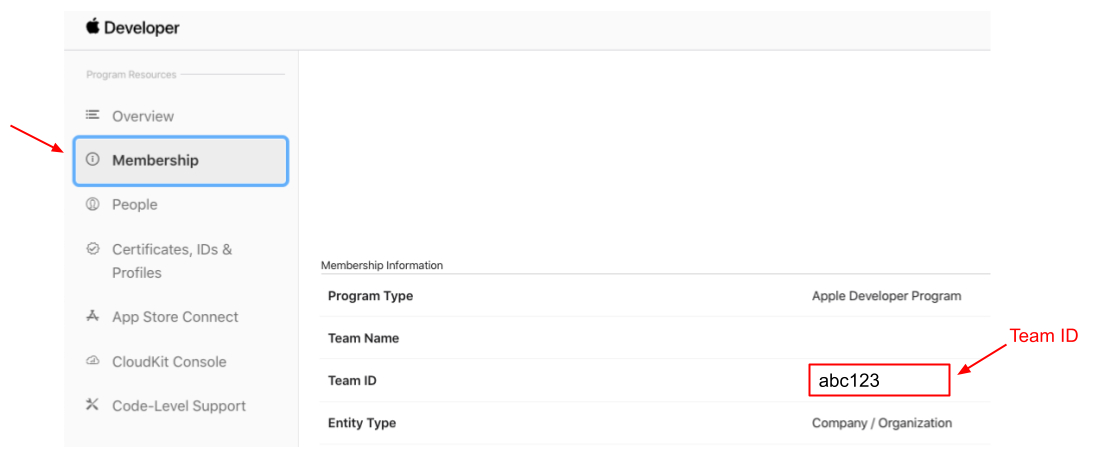
- Send your Customer Success Manager the Mobile App Name, Team ID, and Adam ID (the App Store's numeric ID for your app) for each production instance of your app. Unit shares them with Visa so Visa can link your app to your card program.
- The Mobile App Name and the Adam ID can be found in App Store Connect after selecting one of your apps:
- The Team ID can be found in your Apple developer account under the "Membership" section:
- The Mobile App Name and the Adam ID can be found in App Store Connect after selecting one of your apps:
Step 2: Set Up Your App Once Apple Grants the Entitlement
Once Apple grants the entitlement, add it to your distribution provisioning profile and turn on the Wallet capability for your app in your Apple developer account.
Add the In-App Provisioning Entitlement
- Sign in to your Apple developer account.
- Navigate to "Certificates, Identifiers & Profiles".
- Select "Distribution" underneath the "Profiles" heading on the sidebar.
- Select the distribution iOS provisioning profile that will be used to deploy the app to the App Store.
- Select the "Apple Pay In-App Provisioning Distribution" entitlement from the drop-down to add the entitlement to the profile.
Add the Wallet Capability
- Sign in to your Apple developer account.
- Navigate to "Certificates, Identifiers & Profiles".
- Select "App IDs" underneath the "Identifiers" heading on the sidebar.
- Select the app identifier that will be used to deploy the app to the App Store.
- Under the "Capabilities" tab, select the "Wallet" capability:

Requirements Complete
Once you've sent Unit your app details, Unit sets up push provisioning with Visa, which typically takes 10–20 business days. Your Customer Success Manager will let you know when setup is complete and your developers can start the integration.
Part 2: Integration
Start once Unit confirms that setup with Visa is complete. Both build paths use the Unit Push Provisioning SDK, Unit's software development kit (SDK), which wraps Visa's Digital Enablement (VDE) SDK, fetches the card's wallet data from Unit, checks which wallets the card can be added to, and presents Apple's add-card sheet.
Choose your build path:
- Card component: The Unit iOS Components SDK (4.0.0 or later) runs the Unit Push Provisioning SDK for you. Follow Add Card to Wallet in the Card component guide, which covers installation and configures push provisioning through the Components SDK (
configureVisa). Then continue to Part 3: Test and Launch. - Custom integration: You build your own card screen and Add to Wallet button, and your app calls the Unit Push Provisioning SDK directly. Follow Unit Push Provisioning SDK below, then return to Part 3: Test and Launch.
Part 3: Test and Launch
- Environment: Test in production, as Visa requires, on a physical iPhone. The Simulator isn't supported.
- Attempt limit: Visa's SDK allows up to 7 provisioning attempts per device per 24-hour period. If you hit the limit, contact your Customer Success Manager.
- Test builds: Distribute test builds through TestFlight, Apple's beta testing service.
- Release: Once testing is complete, release your app to the App Store through Apple's standard process.
Unit Push Provisioning SDK
This section is for the custom integration build path. The Unit Push Provisioning SDK is Unit's iOS SDK for adding cards to Apple Wallet. It wraps Visa's Digital Enablement (VDE) SDK, so your app works with Unit's SDK rather than calling Visa's SDK directly. See the Changelog for what's new in each version.
Requirements
- iOS: 16.0 or later, the minimum of the Visa 5.12.0 frameworks.
- Visa SDK: Visa Digital Enablement (VDE) SDK 5.12.0. The Visa frameworks you embed must be this version, and Unit provides them, except
VisaAnalytics.xcframework, which is versioned separately as 2.1.0. - Device: A physical device and a TestFlight build. Apple Wallet provisioning doesn't run on the Simulator, so test the full flow with a build distributed through TestFlight.
You'll also need:
- Unit's Visa App ID,
b8186bd9-fcba-b77a-11e3-1c0d2e5a3501, which is shared across all Unit programs. - A Unit customer token and the card ID to provision.
Installation
Step 1: Add the UnitPushProvisioning Swift Package
In Xcode, choose File → Add Package Dependencies…, enter the package URL, and add the UnitPushProvisioning product to your app target:
https://github.com/unit-finance/unit-ios-push-provisioning
UnitPushProvisioning is a dynamic framework, so it must be embedded in your app. In your app target, open General → Frameworks, Libraries, and Embedded Content and set UnitPushProvisioning to Embed & Sign.
Step 2: Add the Visa Frameworks
- Drag and drop the following frameworks from the Visa SDK package provided by Unit (version 5.12.0, except
VisaAnalytics.xcframeworkat 2.1.0) into your Xcode project:VisaPushProvisioning.xcframeworkVisaInAppModuleCore.xcframeworkVisaAnalytics.xcframeworkVisaFeatureModuleCore.xcframeworkVisaMobileFoundation.xcframeworkRLTMXProfiling.xcframeworkRLTMXProfilingConnections.xcframework
- Select "Copy items if needed" (if not already selected) and click "Finish".
- Make sure "Embed & Sign" is selected for all the above XCFrameworks.
If any frameworks are missing or the wrong version, the SDK reports it through the error callback.
Step 3: Turn On Wallet and In-App Provisioning
- In your target's "Signing & Capabilities" tab, verify that the Wallet capability is there.
- Open your project's
.entitlementsfile and add the Boolean keycom.apple.developer.payment-pass-provisioning, set to1(true).
Implementation
The Manager
All calls go through UnitPushProvisioningSDK.manager. Every method is available as a throwing Swift call and with a completion handler: configure is synchronous (throws), and walletStatus and startCardProvisioning are async throws. Each example below shows both styles.
Configure
Configure the SDK once, after your app has initialized. Pass the environment and Unit's Visa App ID. The same environment is used for both Unit and Visa. Push provisioning is set up and tested in production only, so use .production to add real cards:
- throws
- Completion handler
do {
    try UnitPushProvisioningSDK.manager.configure(
        environment: .production,  // .production or .sandbox
        visaAppId: "b8186bd9-fcba-b77a-11e3-1c0d2e5a3501"
    )
} catch {
    print(error.localizedDescription)
}
UnitPushProvisioningSDK.manager.configure(
    environment: .production,  // .production or .sandbox
    visaAppId: "b8186bd9-fcba-b77a-11e3-1c0d2e5a3501"
) { result in
    if case .failure(let error) = result {
        print(error.localizedDescription)
    }
}
Visa keeps the first environment it is configured with until the app restarts. Configure the SDK with the environment you will provision in. Calling configure again with a different environment fails.
Set the Customer Token
Set the customer token once, before checking the wallet status or adding a card. The SDK uses it to call Unit's Get Mobile Wallet Payload API for you. Set it again whenever the token changes, for example after it is refreshed:
UnitPushProvisioningSDK.manager.customerToken = customerToken
The Add to Wallet flow runs in this order:

Check Wallet Status
You can check whether the card can be provisioned on this device, for example to decide whether to show an "Add to Wallet" button:
- async / await
- Completion handler
let status = try await UnitPushProvisioningSDK.manager.walletStatus(cardId: cardId)

switch status {
case .ReadyToProvision:   break // show the Add to Wallet button
case .AlreadyProvisioned: break // the card is already in the wallet
case .NotAvailable:       break // hide the button
@unknown default:         break
}
UnitPushProvisioningSDK.manager.walletStatus(cardId: cardId) { result in
    switch result {
    case .success(.ReadyToProvision): break // show the Add to Wallet button
    case .success:                    break // already in the wallet, or not available
    case .failure(let error):         print(error.localizedDescription)
    }
}
Add the Card to the Wallet
When the end customer taps your "Add to Wallet" button, start provisioning. The SDK presents Apple's add-card sheet and returns the resulting status for this device:
- async / await
- Completion handler
let status = try await UnitPushProvisioningSDK.manager.startCardProvisioning(cardId: cardId)
UnitPushProvisioningSDK.manager.startCardProvisioning(cardId: cardId) { result in
    switch result {
    case .success(let status):  print(status)
    case .failure(let error):   print(error.localizedDescription)
    }
}
Add to Wallet Button
Using this button is optional. You can use your own button that calls startCardProvisioning(cardId:) instead.
The SDK provides Apple's Add to Apple Wallet button for UIKit and SwiftUI. It only shows the button: your app decides when to show it and what a tap does. In the examples below, isReadyToProvision is whether walletStatus returned .ReadyToProvision, and startProvisioning() is where your app calls startCardProvisioning(cardId:).
The button adapts to the width you give it: a wide frame shows the single-line layout, a narrow one the compact two-line layout.

- UIKit
- SwiftUI
let button = UnitPushProvisioningSDK.manager.ui.getAddToWalletButton {
    startProvisioning()
}
button.isHidden = !isReadyToProvision
if isReadyToProvision {
    UNAddToWalletButtonView {
        startProvisioning()
    }
}
You can change the tap action later through the button's onTap property.
Handling Errors
Every method throws a UNPushProvisioningError, or delivers it in the completion handler. Match on its reason to decide what to do, and log its description, which includes the operation and the details:
do {
    let status = try await UnitPushProvisioningSDK.manager.walletStatus(cardId: cardId)
} catch let error as UNPushProvisioningError {
    switch error.reason {
    case .missingCustomerToken:
        break // set the customer token and try again
    case .networkFailed:
        break // show a "try again" message
    default:
        break
    }
    print(error.description) // e.g. "Error in walletStatus: the Unit API request failed (HTTP 401: ...)"
}
Error Callback
Some errors are not the result of a call you made, so there is nothing to throw them from. Register a callback to receive them:
UnitPushProvisioningSDK.manager.addErrorCallback { error in
    switch error.reason {
    case .visaSDKMissing:
        break // add the Visa frameworks to your app
    case .unsupportedVisaVersion:
        break // embed the supported Visa SDK version
    case .missingProvisioningEntitlement:
        break // add the Apple Pay In-App Provisioning entitlement
    default:
        break // for example, a failed call made by the Components SDK
    }
    print(error.description)
}
The callback is called on the main thread. You can register more than one.
Errors thrown from a call you make yourself are not repeated in the callback.
Types
UNPushProvisioningError
| Property | Type | Description |
|---|---|---|
| operation | UNPushProvisioningError.Operation | The call or check that failed. |
| reason | UNPushProvisioningError.Reason | Why it failed. Match on this to handle errors. |
| details | String? | Specifics for logs and support, such as the HTTP status and response body. Not meant for matching; the text can change. |
| underlyingError | Error? | The original error, for example a UNNetworkError, URLError, or Visa VPError. |
UNPushProvisioningError.Operation
| Case | Meaning |
|---|---|
| configure | configure(environment:visaAppId:) |
| walletStatus | walletStatus(cardId:) |
| startCardProvisioning | startCardProvisioning(cardId:) |
| requirementsCheck | The checks the SDK runs at app launch. Reported through the error callback. |
UNPushProvisioningError.Reason
| Case | When |
|---|---|
| notConfigured | configure wasn't called, or didn't succeed. |
| missingCustomerToken | No customer token is set. |
| noPresentingViewController | No view controller was available to present Apple's add-card sheet. |
| networkFailed | The Unit API request failed, for example an invalid or expired customer token, an unknown card ID, or no connection. |
| visaFailed | The Visa SDK reported a failure, including rejecting the configuration. |
| visaSDKMissing | The Visa frameworks are not linked in your app. Reported through the error callback. |
| unsupportedVisaVersion | One or more embedded Visa frameworks don't match the supported version. details lists them. Reported through the error callback. |
| missingProvisioningEntitlement | Your app is missing the Apple Pay In-App Provisioning entitlement. Reported through the error callback. |
| internalError | Any other failure. |
UNAddToWalletButton
A UIView that shows Apple's Add to Apple Wallet button. Create it with manager.ui.getAddToWalletButton(onTap:), or use UNAddToWalletButtonView(onTap:) in SwiftUI.
| Property | Type | Description |
|---|---|---|
| onTap | (() -> Void)? | Called when the button is tapped. |
UNEnvironment
| Case | Meaning |
|---|---|
| production | Unit's production API and Visa's production environment. |
| sandbox | Unit's sandbox API and Visa's sandbox environment. |
Completion and Callback Types
public typealias UNPushProvisioningCompletion = (Result<Void, UNPushProvisioningError>) -> Void
public typealias UNPushProvisioningStatusCompletion = (Result<VPProvisionStatus, UNPushProvisioningError>) -> Void
public typealias UNPushProvisioningErrorCallback = (UNPushProvisioningError) -> Void
Changelog
5.12.0 (Nov 11, 2026)
- Updated to Visa Digital Enablement SDK 5.12.0. Embed the 5.12.0 Visa frameworks;
VisaAnalytics.xcframeworkis now versioned 2.1.0 on its own track. The SDK reportsunsupportedVisaVersionfor other versions. - Requires iOS 16.0, the minimum of the Visa 5.12.0 frameworks.
- Add to Wallet button:
manager.ui.getAddToWalletButton(onTap:)for UIKit andUNAddToWalletButtonView(onTap:)for SwiftUI show Apple's Add to Apple Wallet button. Your app controls when it shows and what a tap does. - Overlapping
walletStatusandstartCardProvisioningcalls no longer hang; they now run one at a time. - Error messages are now localizable.
5.6.0 (Oct 18, 2026)
- Initial release of the Unit iOS Push Provisioning SDK —
configure,walletStatus,startCardProvisioning, and an error callback, wrapping Visa Digital Enablement SDK 5.6.0.