
Build accounts payable
With an accounts payable (AP) program, your customers pay their vendors from inside your product. You approve bills, pull the funds, take your fee, and send each payment out over the right rail. This tutorial shows how to build that on Unit using six API resources, and points to the API reference for each step.
What You Will Build
Throughout the tutorial we use a running example. Restaurant Hero is a software company that serves 10,000 restaurants. It already knows who each restaurant buys from, how each vendor wants to be paid (check, bank transfer, or card), and who has to approve the bill. That makes it well placed to launch AP.
Here is one bill run. Restaurant 1 approves three $1,000 bills. Restaurant Hero pulls $3,030 from the restaurant's Chase account into a wallet, charges a $10 fee per bill, which lands in its own revenue account, and pays each vendor $1,000. The wallet ends the run back at $0.
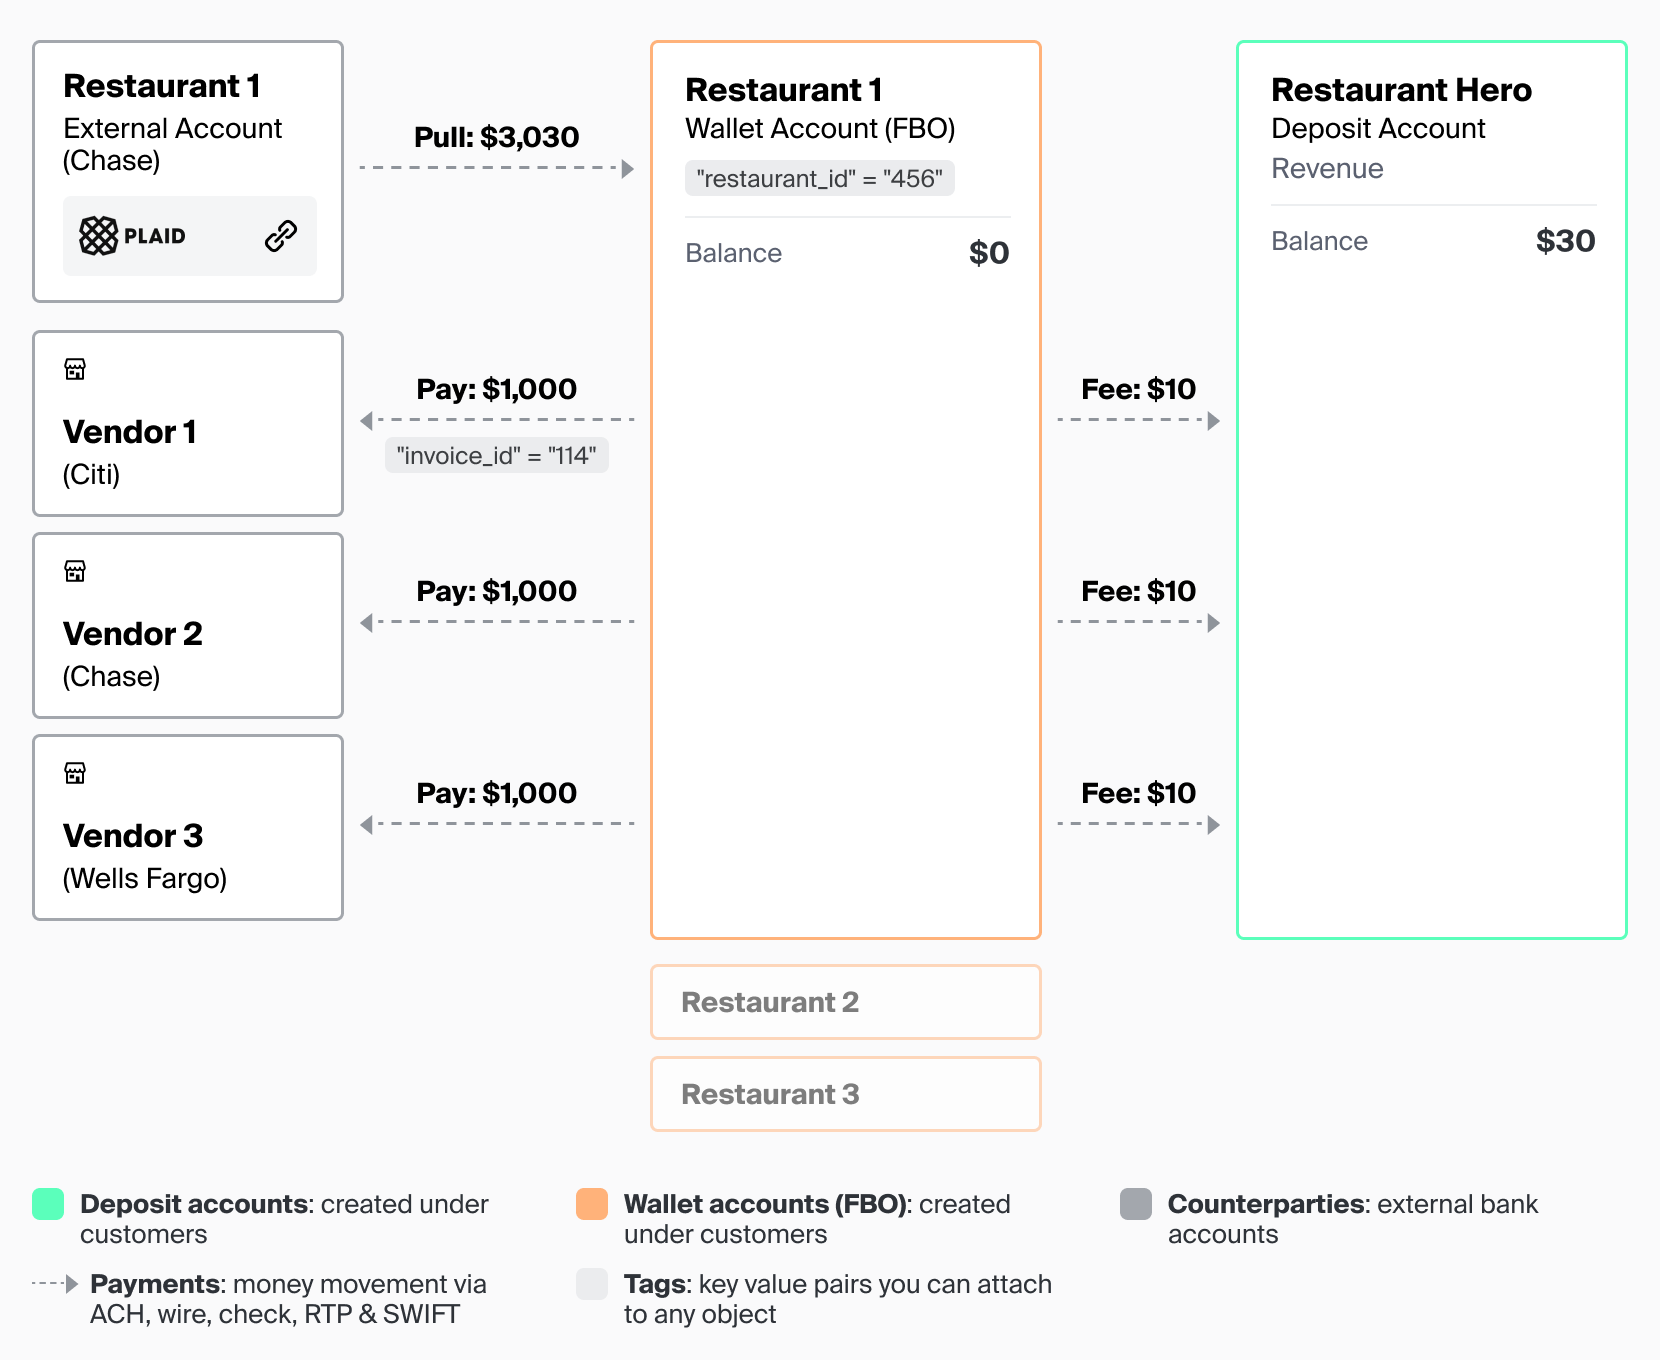
How to read the diagram:
The boxes are accounts and the parties around them. The colored outline around each box shows its type, as in the key at the bottom.
- The orange box is Restaurant 1's wallet account (FBO). It's a pass-through account with its own routing and account numbers, and its balance usually sits at $0. The faded orange boxes below it are the wallets of Restaurants 2 and 3, set up the same way.
- The green box is Restaurant Hero's revenue deposit account. The $10 fee from each bill lands here.
- Gray boxes are counterparties: the restaurant's own external bank account, linked through Plaid, and each vendor's bank.
- Arrows are payments. Gray labels such as
"invoice_id" = "114"are tags that tie each payment back to an ID in your own system.
Primitives You Will Use
| Primitive | Role in an AP program | Reference |
|---|---|---|
| Customers | Your company and each business you serve, onboarded through an application | Customers |
| Wallet accounts (FBO) | A pass-through account for each customer, which funds bills and pays vendors | Wallets |
| Counterparties | External bank accounts: the customer's funding account and each vendor | Counterparties |
| Payments | Money movement over ACH, book, wire, real-time payments (RTP), and checks | Payments |
| Tags | Key-value pairs that link Unit objects to IDs in your own system | Tags |
Step 1 - Set Up Your Program
Before you onboard a single restaurant, you need a sandbox, an API token, and webhooks.
Get Sandbox Access
Sign up for a sandbox and create an API token from the dashboard. Every resource in this tutorial can be created and tested there first. Using the API covers authentication, the JSON:API request format, and idempotency keys. We recommend sending an idempotency key with every request that creates something, so you can safely retry it.
While you're in the dashboard, subscribe to webhooks. Payments in an AP program move through several states over hours or days, and webhooks are how you'll find out when a debit clears or a vendor payment comes back.
Step 2 - Onboard Your Customers
Every restaurant on Restaurant Hero becomes a Unit customer with its own wallet, a linked funding account, and a list of vendors. Most companies run these steps when a customer turns on AP inside their product.
Create the Customer
Submit a business application (businessApplication) for each restaurant. It collects the information needed for KYB (know your business), such as the legal name, EIN, officer, and beneficial owners. When the application is approved, Unit creates a business customer. Applications can be approved instantly or go to manual review, so listen for the application webhook events rather than assuming you'll get an immediate result.
If Restaurant Hero already offers banking and the restaurant is already a customer, skip this step and reuse their existing customer ID.
Open a Wallet and Link a Bank Account
When customer.created arrives for a restaurant:
Create a wallet account (walletAccount) under each customer, referencing your Wallet Terms. The customer only exists once the application is approved, so don't try to create a wallet any earlier. In the diagram it's the orange box. We recommend tagging each wallet with your internal ID, for example "restaurant_id" = "456". Then any webhook event or transaction that reaches you can be matched to a restaurant without an extra lookup.
Wallets are the most common choice for AP because the restaurant doesn't need to open a full bank account. The wallet works as a pass-through: money arrives to fund approved bills and leaves to pay vendors, so its balance usually sits at $0 between runs. It still has its own routing and account numbers, which matters later if a restaurant wants to push funds in.
Wallet Terms decide what each wallet can do, so configure them for your AP flow before you go live. For AP, the settings that matter most are:
- Limits on ACH debits, per payment and per day, since debits are how bills get funded.
- Clearing periods on those debits, which control how soon funds can go out to vendors.
- Fees applied at the wallet level.
You can assign different terms to different groups of customers, for example tighter limits for newly onboarded restaurants. In sandbox, walletDefault covers all of this. In production, Unit configures the terms with you. Learn more about wallets.
Connect their bank account. You need this whenever money moves between the wallet and the restaurant's own bank, such as pulling funds for bills with an ACH debit (see Fund the bill run). In our example, Restaurant 1 funds its bills from its Chase account. Have the restaurant link that account through Plaid, then create a counterparty (achCounterparty) from the processor token. You never handle raw account numbers, you can optionally verify that the account holder's name matches, and you can check the balance before debiting. Set the counterparty's permissions to allow debits, because you'll be pulling from this account.
Add Their Vendors
Create one counterparty for each vendor the restaurant pays, such as the landlord, the produce supplier, and the utensils supplier. These are the gray vendor boxes in the diagram. When the restaurant enters vendor bank details in your UI, create the counterparty with the routing number, account number, account type, and name. Tag each one with your own vendor_id so you can move between your records and Unit objects.
A few behaviors worth designing for:
- Counterparties created from routing and account numbers default to credit-only. That's the right setting for vendors, since you only ever send them money.
- Some vendors have no bank details at all. You don't need a counterparty to pay them by check, because a check payment carries the mailing address itself.
Bill entry, approvals, and vendor management live in your product, not in Unit.
Step 3 - Pay a Bill
Once a restaurant approves bills in your product, a bill run takes three kinds of payment: fund it, collect your fee, and pay the vendor. You can use different rails for funding and for disbursement. We'll follow Restaurant 1's $3,030 run from start to finish.
Fund the Bill Run
Originate an ACH debit (achPayment with direction Debit) from the restaurant's linked counterparty into its wallet. For Restaurant 1, that's $3,030 pulled from Chase: three $1,000 bills plus $30 in fees. Amounts in the API are in cents, so this request carries 303000. You can debit an existing counterparty or pass a Plaid processor token directly on the payment.
ACH debits carry return risk. The restaurant's bank can return the debit for insufficient funds, a closed account, or an unauthorized transaction, sometimes days after the money looks settled. Your clearing period is the main lever here. Funds from a debit are held for a set time before they can be spent, and you can wait for that before paying vendors. Clearing periods are set in your terms, and you can also set one per payment: pass clearingDaysOverride on the ACH debit to shorten the clearing period for customers you trust. This requires dynamic clearing periods to be enabled for your program. Learn more about ACH.
This is a decision point for your business:
- Pull with an ACH debit. It's the smoothest experience, because the restaurant approves and you do the rest. You carry the return risk, which you manage with Plaid balance checks, clearing periods, and per-customer limits.
- Have the restaurant push funds. They send an ACH credit or wire to the wallet's routing and account numbers. You take on no return risk, but the restaurant has an extra step and you wait on them.
Whichever you choose, we recommend monitoring returns through ACH payment webhooks and building a clear path for your operations team when one arrives.
Collect Your Fee
When the funds land in the wallet, charge your fee with the Fees API. Create a fee (fee) against the restaurant's wallet, and the amount moves to your revenue account. Unit sets that account up for you when your organization is created, so there's nothing to open first. In the example, that's three $10 fees on Restaurant 1's wallet, each tagged with its invoice_id. As with every amount in the API, a $10 fee is 1000 cents.
Pay the Vendor
Send each vendor their $1,000 over the rail they prefer. The vendor usually decides how they want to be paid, so capture that preference when the restaurant adds the vendor and use it for every payment. The rails differ in speed, cost, and what the vendor needs to receive them:
| Rail | Resource | Typical arrival | Good for |
|---|---|---|---|
| ACH credit | achPayment | 1–2 business days, or same day with same-day ACH | Most recurring vendor bills |
| Wire | wirePayment | Same business day | Large or time-critical payments |
| Check | checkPayment | Several business days by mail | Vendors with no bank details, such as a landlord who wants paper |
| Real-time payments | realtimePayment | Seconds, 24/7 | Urgent payments, when the vendor's bank supports RTP |
Same-day ACH and wires are off by default. Unit enables them for your program, and wires have a minimum amount set by our bank partner. Faster rails cost you more, and many companies pass that cost on as a premium fee, covered in the next section. Tag every vendor payment with its invoice_id.
Once all three payments go out, Restaurant 1's wallet is back at $0.
Track Status and Reconcile
Payments move through statuses over hours or days. Your bill UI should show each status rather than a single "paid" flag.
- Webhooks. Subscribe to payment and transaction events to learn when a debit clears, a vendor payment is sent, or a payment is returned. Verify each event's signature before you act on it.
- Checks. A check payment reports its progress from production through delivery, and it can come back as returned. You can cancel a check before it's mailed or stop payment on it afterward.
- Returns. A returned funding debit means the run isn't funded. Decide in advance whether you hold vendor payments until debits clear, or front the money and recover it.
- Reconciliation. Tags on a payment are copied to the transactions it creates. With
restaurant_idon the wallet andinvoice_idon each payment, you can match every ledger line to a bill in your own system.
Step 4 - Monetize Your Program
An AP program can make money in three ways. Most companies combine them.
- Transaction fees. Charge per payment, for example $0.50 for ACH and $7 for a wire, and charge it with the Fees API as shown above. Fee schedules can differ by customer, and you can charge a premium for faster or accelerated payments.
- Float. Money sits in the system between funding and payout, and even more so if you add speed bumps before payments go out, for risk management or pricing. Those balances earn float across all your customers' wallets, which is paid to your revenue account automatically.
- Software fees. Bundle AP into a higher plan, such as a $850 a month Pro subscription, or charge for access to the feature on its own.
Fee levels and how float revenue is shared are part of your program terms with Unit, so we'll work them out with you.
Next Steps
- Build the whole flow in sandbox, starting with the API quickstart.
- Use sandbox simulations to test approvals, incoming payments, and returns before you go live.
This tutorial covers the common shape of an AP program, and yours will have its own edge cases. If you're designing one, talk to our team. We're happy to look at your flow of funds with you.